I love mason jars — they are simple and sweet and have dozens of uses. My cousin and his wife displayed gorgeous hydrangeas in blue mason jars (the “real deal” old school ones) at their wedding and I’m hoping perhaps my aunt has held on to them so maybe, just maybe, I might be able to get a little extra use out of them!
Today I’m sharing how to use a mason jar to create a lantern. Imagine several of these flickering jars hung at various heights under an old oak tree — no matter your style these will add an extra little spark!
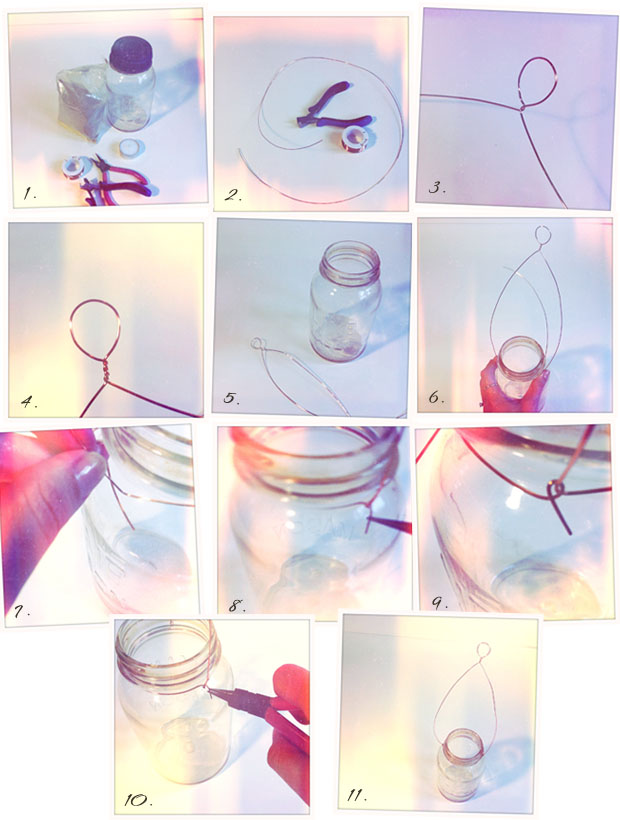
1. Round up your supplies. You will need:
- A mason jar of your choice — You can buy jars new or you can go hunting for them at local thrift stores. The blue ones are especially nice and, if you’re lucky, you may even find some in a few other shades; the one I’m using is a vintage jar my mom found for me with a pink tint to it!
- Wire — I used 20 gauge and would not recommend using anything thinner. Make sure whatever wire you choose is pliable enough for you to work with.
- Wire Cutters and Small Pliers — You can make the lanterns without these, but the tools make it way easier!
- Sand — You could add other things like river rocks, sea glass, or marbles if you’d like (just make sure they are items that will not melt easily).
- Candle — A tea-light or a votive will work best.
2. Cut a length of wire to approximately 36 inches long.
3. Find the middle of your wire and twist a small loop — think about where you’ll want to hang it, so that you do not make the loop too small.
4. Twist the ends of the wire a few times to make sure your loop is secure.
5. Now that you have your loop, you’re ready to attach the wire to the mason jar. Allow about 8 inches from your loop down and bend both ends of the wire slightly to mark the measurement.
6. Hold the wire around the lip of the mason jar, bending your wire ends in opposite directions around the jar (be sure the wire is under the lip).
7. Start with one end of wire, bend around the jar, and secure it around the other piece and the bend in the wire.
8. If you have small pliers, use them to help wrap the end of the wire around itself as pictured.
9. You may have a little extra wire (if you prefer to have more, increase your initial length).
10. Make sure any rough ends are wrapped around and tucked in.
11. Repeat for the other end of the wire and then you’re done with the basic construction of your lantern.

12. From here on out you can get a bit more creative. I poured sand into mine.
13. Pour in about an inch or so of sand.
14. This will add a little weight.
15. I used a tea light candle.
16. Set your candle in the bottom middle of your jar.
17. Voila! Your lantern is ready to use as is or can be dressed up with ribbon, twine, beads, etc.


